
Design of a fully portable Observatory
Compact, portable, and capable of scientific data collection. After a high school trip to a New Mexico Observatory, I embarked on a quest to design a portable telescope rig capable of top-notch performance. Scroll to the bottom for an itemized description of the setup.

Initial Rig Design
The initial rig involved a 114mm diameter Newtonian carried on a Celestron AVX mount. Scope aperture quickly became a limiting factor, as did focuser stability (not designed for heavy weights such as cameras).
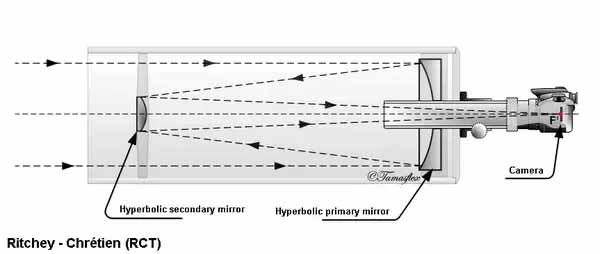
Upgrade 1: Ritchey-Chretien Optical Tube Assembly
Determined to photography the 2017 Solar Eclipse, I eventually settled on the Ritchey-Chretien optical design. With an unique primary-secondary mirror geometry resulting in a flat-imaging circle at the focal point, this design is optimized for astrophotography.
Old and New
The new Astrotech 8" Ritchey Chretien OTA on the Celestron AVX mount, next to the 114mm Newtonian on a smaller, unpowered mount.
Sketchy Astronomy: Solar Filter Edition
Not all astronomy gear has to be precision-made. Using a paint bucket lid painted black as a frame, I adapted a 8" Mylar solar filter sheet (and duct tape) to create a sketchy-looking, but effective, solar filter to safely observe and photograph the eclipse before and after totality.
Initial Imaging Device: DSLR
For image capture, I used a Canon T6s. Witht his setup, the telescope was acting as a gigantic, manual camera lens, as the camera attached via a 2" eyepiece adapter.
Upgrade 2: Guidescope
Used for correcting tracking error the mount encounters as it follows an object across the night sky, guidescopes are essential for sucessful long exposures of celestial objects. With my particular setup, I noticed blurring after anything over 30s in exposure time without a guidescope. As a light-weight and cost effective guidescope package, I chose to use an Orion 50mm guidescope paired with a ZWO ASI-120mm monochrome camera, which uses a CMOS sensor. The guide camera interfaces with a computer via USB and the tracking mount via RS-232.
Upgrade 3: CCD Imaging Device
There are two main types of digital imaging sensors: CMOS, and CCD. The cheaper and more conventional CMOS sensors, like what's in the Canon T6s, have a disadvantage compared to CCDs for astrophotography: CCDs are much more sensitive to light. So, I chose a imaging system that would run off my portable 12v power pack, yet still deliver top-notch performance. Settling on the SBIG STF-8300, a monochrome CCD with active cooling, I also chose a set of Baader LRGB filters for my electronic 36mm filter wheel. This allows the camera to take a overall "luminence" image with the clear filter for calibration, then take a separate image of blue, red, and green, using each filter to selectively let in that frequency of light. The software can then combine the images into a single color image.
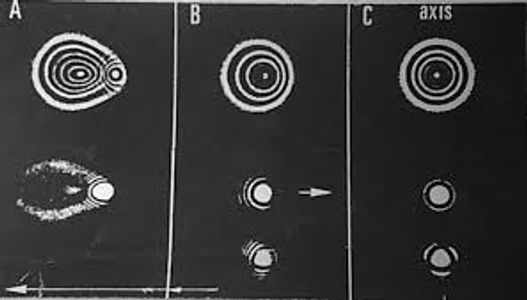
Upgrade 4: Autocollimator
When an optical system is out of collimation, stars and other astronomical objects can become out of focus or even skewed, as shown by the diagram. I managed to get my hands on a tool for correcting this: the Astrosystems 2" autocollimator.
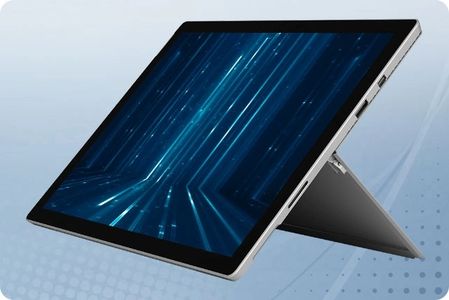
Upgrade 5: Computer
Looking for a lightweight, low power computer I could run the telescope and cameras with, while also charging the computer off my 12V power pack, I eventually settled on a Microsoft surface pro 4. However, I hit a roadblock almost immediately: the tablet only has 1x USB port, and to control the guidescope, telescope and camera, I needed at least 3 ports...
Custom Surface Dock
To improve my I/O situation on my Surface, I decided to modify one of the old surface pro 3 docks. As the dock runs off 12V, I could power all my peripherals and my computer off my battery pack simultaneously. However, I didn't have anywhere to place the bulky dock, which was designed for desk-top use. So, I gutted the electronics from the dock, mounting the main PCB on one of the tripod legs. I also lengthened the cable run from the PCB to the proprietary surface-dock connector to 3m, giving me plenty of room to walk move around the telescope and share the screen with others while still connected to the system.
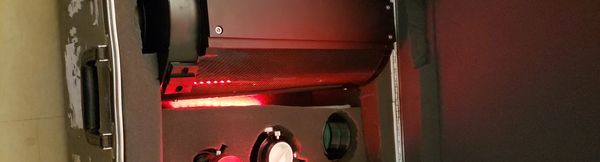
Upgrade 6: Protective OTA Case
After several months of delicately packing my optical tube into my car's trunk after every night out, and scratching the tube a bit during transit, I decided to build a protective case for the tube to live in. With an old storage trunk, some foam, glue, exacto knife, a 5V battery, and RGB lighting strips, I had myself a pretty nice case with day/night lighting for my telescope, so I could still see where things in the case are at night.
Upgrade 7: Power
The lead-acid battery pack I had been using was not cutting it. After looking around and being upset with how expensive commercial off-the-shelf battery packs were, I decided to build my own. For this I required batteries, and lots of them.
More Power
Similar to an electric car battery sled, I connected dozens of 18650 lithium ion batteries together to create a large, higher-voltage battery. To do this, I used a kit available from VRUZEND, which enables you to connect the batteries together in a modular fashion without any soldering. This design allows for easy modification of the overall battery, including capacity upgrades and replacement of individual batteries which may go bad over time.
Accidental Plasma-Arc Welder
Note: Keep positive and negative terminals separated at all times. Imagine my surprise when I accidentally vaporized not only a battery terminal, but part of my desk as well!
I swear it's not a bomb
Using a generic hard-case as the new home for my power bank, I made room for a the battery pack, battery meter, 12v DC converter, 120v AC inverter, and a battery management system. There was even enough room to internally house the batter charger!
Current Portable Observatory Build

Primary Optics
8in Astrotech Carbon-fiber Ritcher-Chretien Optical Tube Assembly
- Quartz mirror substrate with dielectric coating
Focuser
Moonlite 2in drawtube
Primary Imaging Device
SBIG STF-8300 (monochrome)
- FW5-8300
- Baader 36mm LRGB Filters
- OAG-8300 Off-axis guider
- 12V input
Backup Imaging Device
Canon T6s
- 12V power supply
Guide Optics
Orion 50mm Guidescope
ZWO ASI120mm-S (monochrome)
Tracking Mount
Celestron AVX German Equatorial Mount
- Polar scope
- 2x 11lbs counterweights
- Tripod
- 12V input
Computer
Microsoft Surface Pro 4
- Custom surface dock to mount tablet on tripod leg, providing 4x USB 3.0 and charging for tablet
- 12V input
Custom Power Bank
- 25.2V Lithium-Ion power bank
- 7x 18650 batteries in series (3500mAh)
- 8x each cell in parallel
- total capacity: 705.6Wh
- Waterproof hardcase, interior foam lining
- Battery capacity Meter
- 12V DC-DC converter
- 3x 12V car charger port
- 2x 5V USB output
- 120V Power Inverter
- 2x 120V output
Software
Imaging:
- Guiding: PHD Autoguider
- Image Capture:
- Backyard EOS for Canon
- CCDOps for SBIG CCD
- Stellarium
Processing:
- Adobe
- Photoshop
- Lightroom
- Registax
- Deep Sky Stacker
- Autostakkert3